Run WRF on Windows Azure
- You are ready to run WRF on Windows Azure! To do that, we will need to mount the VHD file from your Windows Azure storage account and submit a new compute job to the cluster. Jobs are submitted from a Command Prompt window on the cluster head node.
In this part of the tutorial, you will connect to the cluster’s head node via Remote Desktop Connection (RDC). You will use hpcpack to mount the WRF VHD file as a drive, and configure the cluster’s firewall for MPI communication.
Open a Remote Desktop Connection to the Head Node
-
Go to http://windows.azure.com to log on to the Windows Azure Management Portal. Be sure to use the same Windows Live ID and password that you used to create your Windows Azure subscription.
Be careful to include the dot ‘.’ between windows and azure if you type the URL. If you omit the dot, you will go to the Windows Azure Homepage, not the Windows Azure Management Portal. -
In the Management Portal, click on Hosted Services, Storage Accounts & CDN, Hosted Services. In the main window, expand the Windows Azure HPC Scheduler Service and expand the HeadNode role. Select theHeadNode_IN_0 role instance and verify that the instance’s status is set to Ready.
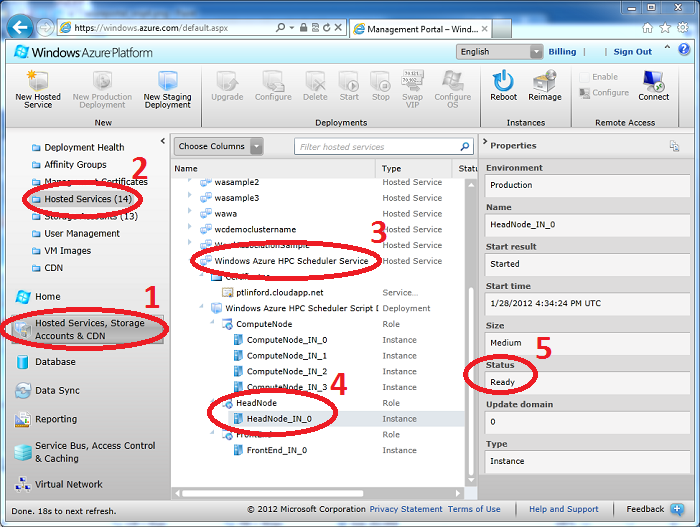
- If the instance is not yet ready, wait until it becomes ready before continuing. It may take several minutes for the instance to transition to the ready state.
-
With HeadNode_IN_0 selected and ready, click Connect on the ribbon bar. Click Open when you are prompted to download the .rdp file.
-
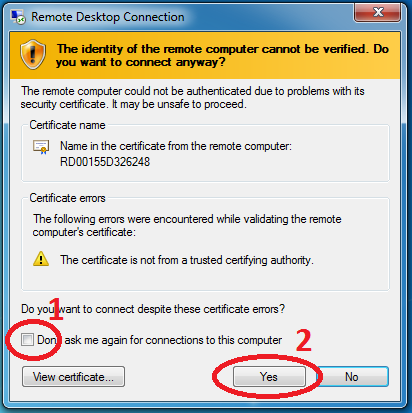
The .rdp file will open in Remote Desktop Connection. Don’t worry if you receive a warning that the remote connection cannot be identified, just click Connect to continue. Enter your administrator password when prompted and click OK. Wait for the connection to be established.
-
Remote Desktop Connection may warn that the identity of the remote computer cannot be verified. If this happens, check the box next to Don’t ask me again for connections to this computer and click Yes.
- The Remote Desktop Connection will open, presenting you with a view of the desktop on the head node. We’ll be using this window throughout this part of the tutorial so keep it open.
Mount the WRF VHD File as a Drive
-
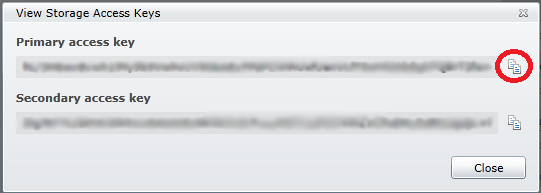
In order to access the VHD file in your storage account, you will need your storage account access key. To locate your access key, return to the Windows Azure Management Console. Click on Hosted Services, Storage Accounts & CDN, Storage Accounts, and select your storage account. Click the View button in the Primary access key panel of the properties pane:

-
Click the Copy to Clipboard button next to your storage account’s primary key and click Close:
 For more information about Windows Azure storage keys, see How to View, Copy, and Regenerate Access Keys for a Windows Azure Storage Account.
 -
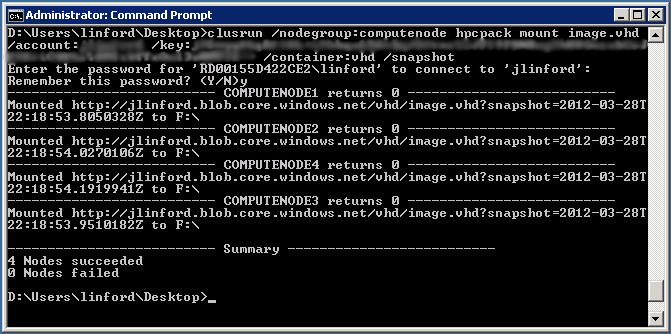
Return to the Command Prompt on the head node in the Remote Desktop Connection window. Type the following command on one line to mount the VHD file as a drive. Replace <account_name> and <storage_key>with your storage account name and key, respectively. Also replace <container> with the name of the blob container you placed wrf.vhd in. Since your storage account key has been copied to your clipboard, you can just right-click the Command Prompt window and select Paste when you need to enter your key.
hpcpack mount wrf.vhd /account:<account_name> /key:<storage_key> /container:<container>
If the command succeeds, you will be informed of which drive letter image.vhd has been mounted as. Drive letter “F” is usually chosen 1.
-
The contents of image.vhd are now available at the specified drive letter on the head node. Only the head node as permission to both read and write files in the VHD file, but you can grant read-only access to all compute nodes. Execute this command to mount the VHD file as a read-only drive on all cluster nodes. Replace<account_name> and <storage_key> with your storage account name and key, respectively. Also replace<container> with the name of the blob container you placed wrf.vhd in:
clusrun /nodegroup:computenode hpcpack mount wrf.vhd /account:<account_name> /key:<storage_key> /container:<container> /snapshot
If the command succeeds, you will see output similar to this:
Configure Firewall Rules for MPI Communication
Before we can run WRF, we must open the firewall for communication between the compute nodes. These steps must be repeated for any application that communicates across nodes.
- Open a Command Prompt window on the cluster head node.
-
Type the following commands to open the firewall to WRF and WPS on all compute nodes. F: is typically the drive letter assigned to your VHD file when it is mounted, but be sure to use the correct drive letter.
clusrun /nodegroup:computenode hpcfwutil register wrf.exe F:\WRFV3\main\ndown.exe
clusrun /nodegroup:computenode hpcfwutil register wrf.exe F:\WRFV3\main\nup.exe
clusrun /nodegroup:computenode hpcfwutil register wrf.exe F:\WRFV3\main\real.exe
clusrun /nodegroup:computenode hpcfwutil register wrf.exe F:\WRFV3\main\tc.exe
clusrun /nodegroup:computenode hpcfwutil register wrf.exe F:\WRFV3\main\wrf.exe
clusrun /nodegroup:computenode hpcfwutil register wrf.exe F:\WPS\geogrid.exe
clusrun /nodegroup:computenode hpcfwutil register wrf.exe F:\WPS\metgrid.exe
clusrun /nodegroup:computenode hpcfwutil register wrf.exe F:\WPS\ungrib.exe
- If you are prompted for a password, enter your administrator password and enter Y to remember the password.
- Wait for the commands to finish. All compute nodes should return 0 to indicate success:
Use Command Prompt to Submit a New Job
You now have everything you need to run WRF on your Windows Azure compute cluster service. Running WRF is a multi-step process, and the actions you take will depend on how you intend to run WRF. Please visit the official WRF tutoral for step-by-step instructions on running WRF.
When you are ready to execute WRF, use the job command to submit a new job to the cluster2:
job submit /jobname:WRF /nodegroup:computenode /numcores:8 mpiexec -np 8 -wdir E:\approot F:\WRFV3\main\wrf.exe
If the job submission is successful your new job will be assigned a number.
Notes
- You can learn more about hpcpack and associated commands in the [[http://technet.microsoft.com/en-us/library/cc972841%28WS.10%29.aspx|Windows HPC Server 2008 R2 Technical Reference (1)
- Jobs can also be submitted via the Windows Azure HPC Scheduler Web Portal. To reach the portal, navigate tohttps://<service_name>.cloudapp.net/portal where <service_name> is the name of your Windows Azure Hosted Service. (2)
A Review of all steps Step 7: Summary