Run POP on Windows Azure
You are ready to run POP on Windows Azure! To do that, we will need to submit a new compute job to the cluster. Jobs are submitted from a Command Prompt window on the cluster head node.
In this part of the tutorial, you will connect to the cluster’s head node via Remote Desktop Connection (RDC). You will use RDC to upload POP and its supporting libraries, configure the cluster’s firewall for MPI communication, submit a new job to execute POP, and finally view the output of the POP command.
Open a Remote Desktop Connection to the Head Node
-
Go to http://windows.azure.com to log on to the Windows Azure Management Portal. Be sure to use the same Windows Live ID and password that you used to create your Windows Azure subscription.
 Be careful to include the dot ‘.’ between windows and azure if you type the URL. If you omit the dot, you will go to the Windows Azure Homepage, not the Windows Azure Management Portal.
 -
In the Management Portal, click on Hosted Services, Storage Accounts & CDN, Hosted Services. In the main window, expand the Windows Azure HPC Scheduler Service and expand the HeadNode role. Select theHeadNode_IN_0 role instance and verify that the instance’s status is set to Ready.
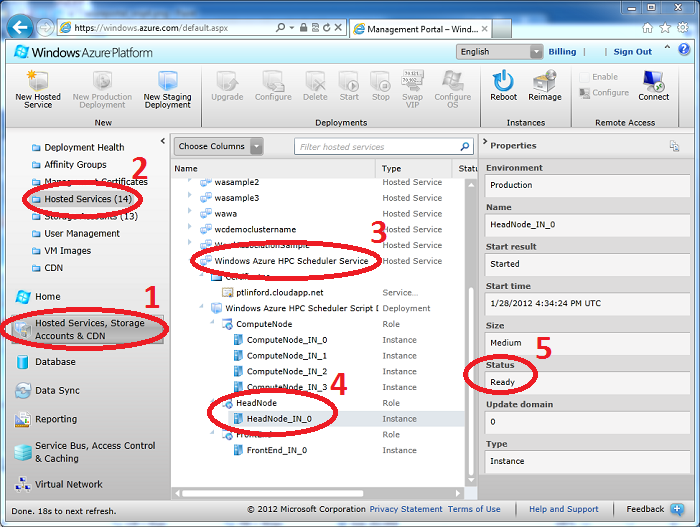
- If the instance is not yet ready, wait until it becomes ready before continuing. It may take several minutes for the instance to transition to the ready state.
-
With HeadNode_IN_0 selected and ready, click Connect on the ribbon bar. Click Open when you are prompted to download the .rdp file.
-
The .rdp file will open in Remote Desktop Connection. Don’t worry if you receive a warning that the remote connection cannot be identified, just click Connect to continue. Enter your administrator password when prompted and click OK. Wait for the connection to be established.
-
Remote Desktop Connection may warn that the identity of the remote computer cannot be verified. If this happens, check the box next to Don’t ask me again for connections to this computer and click Yes.
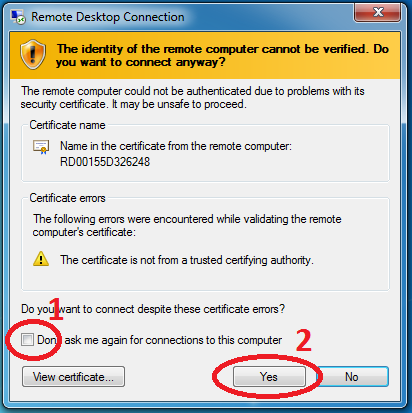
- The Remote Desktop Connection will open, presenting you with a view of the desktop on the head node. We’ll be using this window throughout this part of the tutorial so keep it open.
Upload POP to the Head Node and Distribute
The easiest way to copy files to the cluster is by simple copy-paste over Remote Desktop Connection. We will use this method to upload pop.zip from your Windows installation to the cluster head node. From there, we will distribute POP to the compute nodes.
- On your local Windows installation, use Windows Explorer to locate the pop.zip that you created earlier.
-
Right-click pop.zip and select Copy.
- Open the Remote Desktop Connection window to the cluster head node.
-
On the cluster head node, use Windows Explorer to navigate to E:\approot.
-
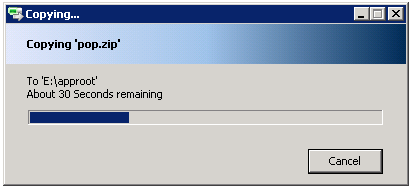
Right-click in E:\approot and select Paste. pop.zip will be copied from your local Windows installation to the cluster:
-
On the cluster head node, right-click pop.zip and select Extract All. Click Extract to create the new E:\approot\pop folder containing pop.exe and its supporting files.
- Open a Command Prompt window on the cluster head node and execute the following two commands to navigate to E:\approot and create a deployment package for POP:
cd /D E:\approot
hpcpack create pop-package.zip pop\
You can learn more about hpcpack and associated commands in the Windows HPC Server 2008 R2 Technical Reference. -
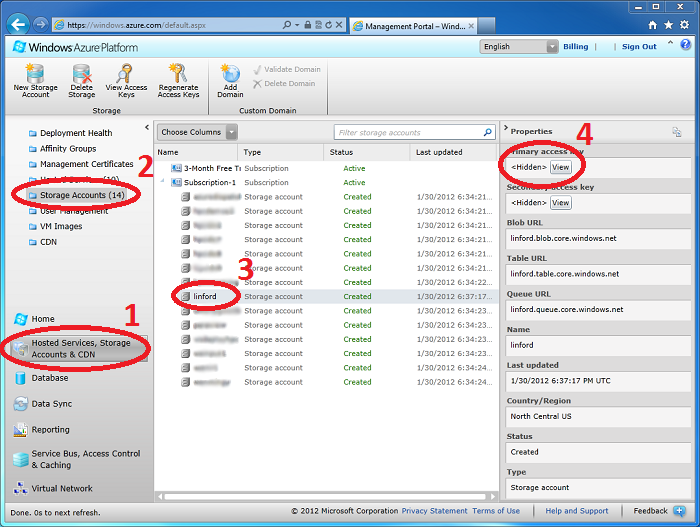
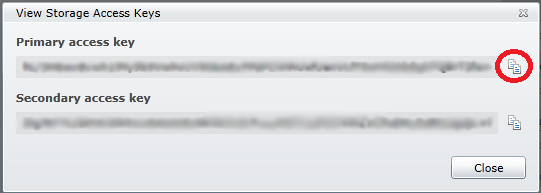
Now that we’ve created the deployment package we will need to distribute to all the cluster nodes and install it. To do this, we will need your storage account access key. To locate your access key, return to the Windows Azure Management Console. Click on Hosted Services, Storage Accounts & CDN, Storage Accounts, and select your storage account. Click the View button in the Primary access key panel of the properties pane:
-
Click the Copy to Clipboard button next to your storage account’s primary key and click Close:
 For more information about Windows Azure storage keys, see How to View, Copy, and Regenerate Access Keys for a Windows Azure Storage Account.
 -
Return to the Command Prompt on the head node in the Remote Desktop Connection window. Type the following command on one line to upload pop-package.zip to your storage account. Replace accountName andaccountKey with the name and key of your storage account, respectively. Since your key has been copied to your clipboard, you can just right-click the Command Prompt window and select Paste when you need to enter your key.
hpcpack upload E:\approot\pop-package.zip /account:accountName /key:accountKey /relativePath:pop
- Sync the compute nodes with the new package:
clusrun /nodegroup:computenode hpcsync
If you are prompted for a password, enter your administrator password and enter to remember the password.
If you are prompted for a password, enter your administrator password and enter Y to remember the password.
- POP is now installed in a special location available to all the cluster compute nodes. The %CCP_PACKAGE_ROOT% environment variable gives the path to this location on each node. You will see this environment variable used several times below.
Configure Firewall Rules for MPI Communication
Before we can run POP we must open the firewall for communication between the compute nodes. These steps must be repeated for any application that communicates across nodes.
- Open a Command Prompt window on the cluster head node.
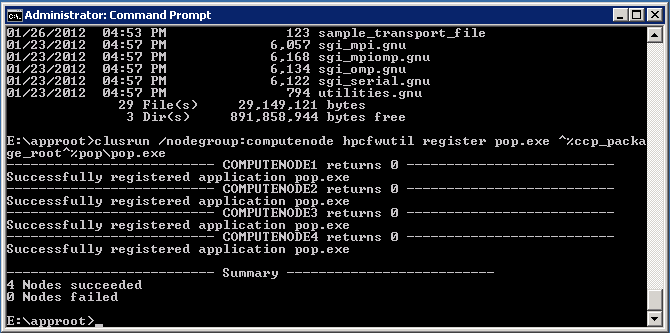
- Type the following command on one line to open the firewall to POP on all compute nodes:
clusrun /nodegroup:computenode hpcfwutil register pop.exe ^%CCP_PACKAGE_ROOT^%pop\pop.exe
The caret sign (^) escapes the environment variable percent sign (%) so that the environment variable will be evaluated on the compute nodes. Without the caret sign, the environment variable would have been evaluated on the head node, before running the command, sending the wrong parameter to hpcfwutil. - If you are prompted for a password, enter your administrator password and enter Y to remember the password.
- Wait for the command to finish. All compute nodes should return 0 to indicate success:
Use Command Prompt to Submit a New Job
With all these preparations complete, we can now run POP on the cluster! We will use the job command to submit a POP run as a new job to the cluster and the HPC Job Manager to monitor the status of our new job and view POP output. 1
- Open a Command Prompt window on the cluster head node and execute the following command:
job submit /jobname:POP /nodegroup:computenode /numcores:4 mpiexec -np 4 -wdir ^%ccp_package_root^%pop ^%ccp_package_root^%pop\pop.exe
If the job submission is successful your new job will be assigned a number. Remember your job number for the next steps.
-
Go to the Start Menu, and click on All Programs, Microsoft HPC Pack 2008 R2, HPC Job Manager to start the HPC Job Manager.
- In the Job Management pane on the left, click on All Jobs and select your job in the main window:
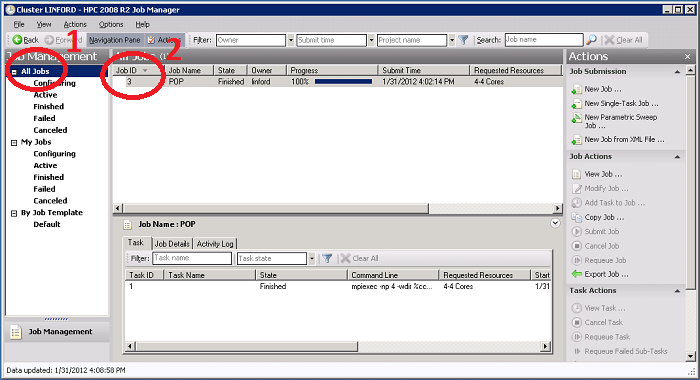
Your job should be in the Running or Finished state. If it is in the Error state, check your job submission command line for errors and resubmit.
-
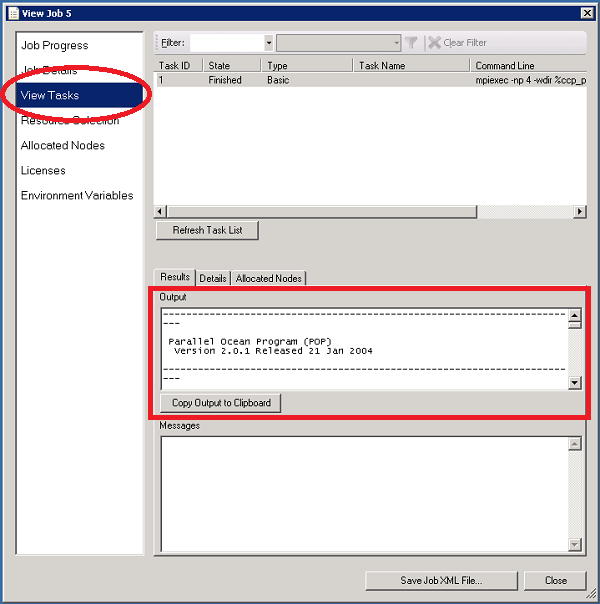
Wait until your job is in the Finished state. The example POP run is relatively small, so it should be finished in about a minute. Double-click on your job in the main window. Select View Tasks on the left and view your job’s console output in the Output box:
Notes
- Jobs can also be submitted via the Windows Azure HPC Scheduler Web Portal. To reach the portal, navigate to https://<service_name>.cloudapp.net/portal where <service_name> is the name of your Windows Azure Hosted Service. (1)
A Review of all steps Step 5: Summary and Downloads